|
To get
such programs as FTP, IRC and ICQ working on your client machines,
you will need to load the appropriate modules into the system
so that it can forward the data. This should be added to the
bottom of your rc.firewall
script that you would have created earlier.
The ip_masc_ftp,
and ip_masc_irc module come with Red Hat 6.2, but the ip_masc_icq
will have to be downloaded off the Internet, the latest file
is ip_masq_icq-0.56.tar.gz
and is easily found by doing a search.
To install
this module simply download the file and extract it by typing tar
-xzvf ip_masq_icq-0.56.tar.gz, then you can read the README
file by typing cat README
| more, now all that is left you do is compile the source
by typing make. Once
the module has been compile form the C source file to make the .o
Object file you should copy this file to your kernel model directory
by typing cp ip_masq_icq.o
/lib/modules/2.2.14-5.0/ipv4/ and then it is ready for you
to use.
Now that
you have all the modules on your system, you need to edit
your rc.firewall
and add these lines of code to the bottom of the script:
# Needed
to initially load modules into the system kernel
/sbin/depmod -a
# Supports the proper masquerading of FTP transfers using
the PORT method
/sbin/modprobe ip_masq_ftp
# Supports the masquerading of IRC DCC file transfers
/sbin/modprobe ip_masq_irc
# Supports the masquerading of ICQ chat/file/message transfers
/sbin/modprode ip_masq_icq
If like
us you can't get the ip_masq_icq
to work (i.e. it give your errors when compiling), there is
another easier way around the problem. In your rc.firewall
add this code at the bottom instead of the /sbin/modprobe
ip_masq_icq:
port=2000
while [ $port -le 2020 ]
do
/usr/sbin/ipmasqadm portfw -a -P tcp -L <optus_ip> $port
-R <client_ip> $port
port=$((port+1))
done
This
will loop around 20 times and forwards ports 2000 -> 2020
to your client machine (which has ICQ), now you just have
to tell ICQ that your behind a firewall and give it the appropriate
settings to use.
Now,
in ICQ's Preferences-->Connection, configure it to be "Behind
a LAN" and "Behind a firewall or Proxy". Now, click on "Firewall
Settings" and configure it to be "I don't use a SOCK5 proxy".
Finally, click on Next and configure ICQ to "Use the following
TCP listen ports.." from "2000" to "2020". Now click done.
ICQ 2000
is a bit different, you need to goto ICQ -> Preferences
-> Connections -> User. Click on "Not using proxy"
and then click on "Use the following TCP listen port
for incoming event". In the From: you want to enter 2000
and in the To: you want to enter 2020. Now just click on Apply
and your almost finished.
Also
note that it was repviously recommended to change ICQ's "Firewall
session timeouts" to "30" seconds BUT many users have found
that ICQ becomes unreliable. It has been found that ICQ is
more reliable with its stock timeout setting (don't enable
that ICQ option) and simply change MASQ's timeout to 160 seconds.
You can change this timeout in the rc.firewall ruleset by
adding the line of code /sbin/ipchains
-M -S 7200 10 160.
You will
probably notice that when you try and connect to an FTP that
is not on the default port (i.e. 21) that you will connect
but will not be able to do a directory list or anything else
for that matter. This is due to the Firewall blocking the
ports your ftp client is trying to use for these commands,
if you try and forward the ftp port it will still not work
(its only connects on that port, the ftp server will use other
ports for commands and sends). To fix this, simply look in
your FTP Client for a option called "Passive Mode"
and enable this, now you should be connect, get a directory
list, download and send like normal.
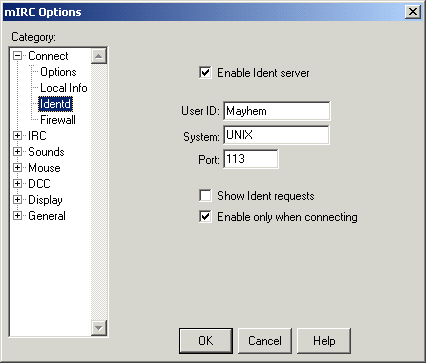
Some
IRC servers require Ident checks and this will prevent you
from connecting full stop (this can also be seen as when u
log-on you are almost immediately logged off) to fix this
all you need to do (in mIRC) is go into File -> Options
and under "Connect" go into "Ident". In
the Ident section you want to check the "Enable Ident
server" checkbox and enter a User ID (nickname is recommended),
then simply click OK (your screen should look similar to the
first image below). After doing this you need to forward the
Ident port (113) to your client machine, to do this simply
add this line to you Firewall file: /usr/sbin/ipmasqadm
portfw -a -P tcp -L <server_ip> 113 -R <client_ip>
113.
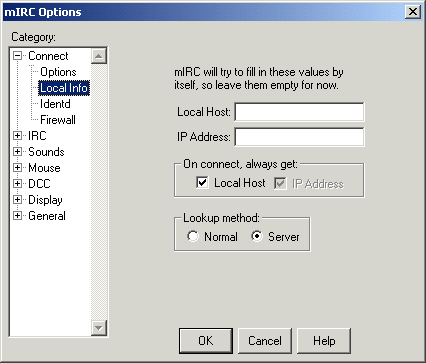
Another
thing is that your Fserv or XDCC server will not work in mIRC,
this is because of the Firewall once again (damn Linux is
too secure for its own good). To get this working is even
simpler than the above, all you need to do (in mIRC once again)
go into File -> Options and under "Connect" this
time go to "Local Info". In the "Local Host"
and "IP Address" boxes you want them blank (as you
want them to be established upon connection), you will need
to check both the "On connect, always get:" boxes.
The only real change you will need to make is the "Lookup
method:", you want to make sure you have "Server"
checked otherwise it will find your internal hostname and
IP not your external one (your settings should look similar
to the second image below). This has been tested and works
between both our machines (i.e. from one machine behind a
Linux Firewall to another behind a Linux Firewall) which means
it should work for any case.
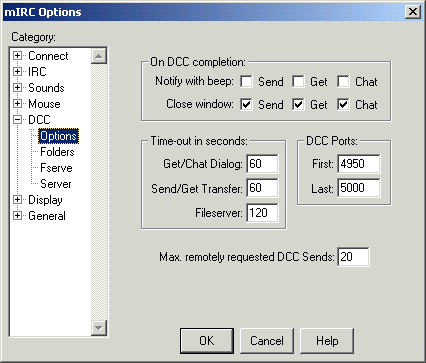
Another
thing you might want to do is to allow TCP and UDP ports from
4950 - 5000 through to your machine, once you have done that
you can then setup mIRC to use these ports for DCC sends and
that will help to make sure that everyone can accept a DCC
send from you, below is an example using port auto forwarding:
#!/bin/sh
echo " - Allowing IRC FSERV (TCP 4950 - 5000) ...";
port=4950
while [ $port -le 5000 ]
do
/usr/sbin/ipmasqadm
autofw -A -r tcp $port $port -h 192.168.0.2
/usr/sbin/ipmasqadm
autofw -A -r udp $port $port -h 192.168.0.2
port=$((port+1))
done
In this
example the client machine is 192.168.0.2, you can change
this to suit your IP and if you want to add more clients simply
duplicate the two ipmasqadm
lines and change the IP for the second machine, once you have
done this then just setup mIRC by going to File -> Options,
under DCC select Options, then change the DCC ports from 1024
- 5000 to your new forwarded ports 4950 - 5000.
|