|
|
Date: |
September
22nd, 2003 |
| Type: |
Review |
| Supplier: |
D-Link
|
| Author: |
mayhem |
| R.R.P: |
$169.95
(AUS) |
With broadband becoming
more and more common to see in Australian Businesses and Homes, there
is a need to make connections more and more reliable and to share broadband
connections between computers within a network. The best alternative to
running a Server (which is costly in a small network environment) is to
use a Router which itself acts as a server managing a broadband connection
and sharing it among the computers that require it. The D-Link DI-704P
is one such router with the added feature of a single port print server
integrated into its design.
Product Description:
The DI-704P is an
Ethernet Broadband Router with a built-in 4-port switch. It also features
a parallel port to share a printer on the home or office network and includes
a print server application for Windows (unfortunately no provided support
for Linux). As many as four computers can be connected to the routerís
integrated switch, using its four 10/100Mbps AutoMDIX Ethernet ports.
The DI-704P package even includes an Ethernet cable to get you started.


The DI-704P is ideal
if youíre creating your first home or small business network, or if youíre
a more advanced user looking for additional management settings.
The DI-704P includes
a new, easy-to-use D-Link web-based graphical user interface (GUI) to
configure the router. To prevent unwanted Internet intruders from accessing
your private network, the DI-704P also serves as a feature-rich firewall.
So, whether youíre
a college student who wants to network with friends and roommates, an
executive working at home or in a small office, or a concerned parent
who just wants to have more control over how your children access the
Internet, then the D-Link Express EtherNetwork DI-704P is the networking
solution for you, even if you donít know anything about networking.
The DI-704P comes
with a 1 year limited warranty.
Features:
- Inbuilt Firewall
protection for our network
- 4 Port 10/100Mbps
Auto-MDIX Switch
- Share your Cable/DSL
connections with upto 253 machines
- Easy to Setup
and Upgrade
- Web-Based Configuration
(making it Operating System Independent)
- Parallel Printer
Port (Connect & Share Printer)
- DHCP Client /
Server Support
- VPN Pass-Through
Support
- Virtual Server
/ DMZ Support
- PPPoE Support
- Remote Administration


PORTS: 4 x 10/100Mbps
RJ 45 Auto Sensing; 1 x 10BT WAN; 1 x RS-232 ; 1 Printer Port (Female
DB-25) VPN PASS THROUGH FUNCTION: PPTP , L2TP ,IPSec COMPLIANCE: IEEE
802.3, 802.3u, 802.3x Flow Control, 802.1p Priority Queue ANSI/IEEE 802.3
NWay auto-negotiation
DIMENSION: 300mm
x 142mm x 40mm ( W x D x H )
What you get:
The DI-704P comes
with pretty much everything you need to get up and running, this includes:
- 1 x DI-704P Router
with 4-Port 10/100 Switch
- 1 x Power Transformer
- 1 x CAT5 UTP Ethernet
Cable
- 1 x Print Server
Software (Windows OS Only)
- 1 x Manual (Quick
Installation Guide)


Setting Up:
The first thing you
need to do once you have connected the unit to your DSL or cable modem
(and to the computers on your network) is make sure your computer is set
to obtain its IP address from the network (since the router runs a DHCP
server by default). Once you have done that your machine should receive
an 192.168.0.x IP address (check this via ipconfig for Windows of ifconfig
for Linux).
To connect to the
router via either its Web-Based GUI on port 80 or telnet into the telnet
server on port 23, I recommend the GUI if your browser supports it (which
just about all browsers these days will) as it makes the configuration
process a whole lot simpler.
When you connect
to the router via the web-based GUI, you will be prompted for a username
and password by this login screen,
by default this is originally:
Username: admin
Password: <blank>
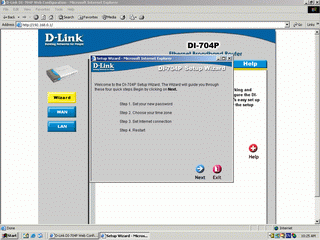
Once logged in you
will be given the main page of the router, which contains the "Run
Wizard" button, simply click the button and then follow the 4 simple
steps to setup your router:

Using the wizard
is by far the easiest way to setup the router quickly, just simply follow
the wizards steps:
Step 1 - Set your
new password
It is a good idea
to put a password on your router for security purposes, more so for business
applications, simply entire the password you want to use and then enter
it again to confirm:
Step 2 - Choose
your time zone
Select the appropriate
time zone for where you live, e.g.. In Sydney you should select GMT +10
hours (unfortunately this is not labeled in the router as Sydney, but
that doesn't really affect anything).
Step 3 - Set Internet
connection
If your using DSL
(such as Netspace, iiNet etc) then you will need to select PPP over Ethernet
(or PPPoE as it is commonly referred to). This will then require you to
enter a username, password and service name.
Alternatively if
you are using cable such as Optus or BigPond then you need to select the
Dynamic IP Address option. For those with BigPond, this router supports
the BigPond login client, which is a big plus and should make life a bit
easier.
Step 4 - Restart
In order for all these
setup changes to take affect you will need to restart the router. This
only takes a couple of seconds and once again is completely controlled
by the GUI, and once done you will be returned to the routers home page.
Now that you have
setup the router, hopefully you should find that your Internet connection
is up and running and you can surf the web, check e-mail and most things
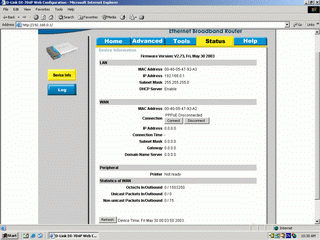
as normal. If you encounter any problems the first place to check is the
Device Info page in the Status section of the routers configuration. The
page looks like this:

On the page you should
be able to check under the WAN heading to see if your router is actually
connecting to your provider or not, from there you will need to trouble
shoot each setup until you find the problem.
NEXT: Advanced
Setup, Testing and Conclusion
|

