|
|
Date: |
April
25th, 2001 |
| Type: |
Review |
| Supplier: |
CrystalFontz |
| Author: |
mayhem |
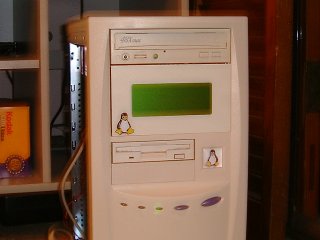
If your really
serious about wanting to have your own professional server then
you will need to get yourself one of these. I am talking about an
LCD display, most servers these days have them, they are quite a
necessity as it allows the admin to just check up the server by
looking at the display on the front of it. Its also a bonus for
those of you who want to check the status of your box without having
to telnet in or hooking a monitor up, not to mention it looks pretty
cool to impress all of your friends. And if you want to make it
look nice as well as be functional then your will probably want
a mounting kit. Well you have come to the right place then cause
we have want you want.
Out Of The
Box:
Well to tell you the truth I was expecting something alot heavier
from the description, but I was impressed when I picked up the box
that it weighed almost nothing (1lb 4ozs which is approx. 1/2 a
kilo). Apon opening it I was even more surprised by the kit already
setup and ready to bolt in.
Inside the
kit you will find:
- 20x4 LCD display (634LG)
- Tux mounting bracket (DBB634LG PC Mounting Bracket for 634LG)
- Serial cable (WR232Y01 9F/9F 6 feet, shielded)
- Power cable (WR232Y02 PC to LED backlight cable)
- Mounting screws (DBB634LG PC Mounting Bracket hardware)
- Instruction sheet

The way that
this kit is packaged allows you to have an easy installation and
to also reduce the risk of damaging the LCD module.
Getting
Started:
The first thing you need to do is to get your case ready (It is
recommended that you turn your computer off and remove the power
plug before commencing with the install). You will have to remove
your case and then once that is done, (if its a single piece cover
then just remove it, if its a two piece you will need to remove
both sides in order to access the screw holes for the bays), then
remove two adjacent 5 1/4" bay covers and also one metal cover
from the back of your machine, these will be where the kit is mounted
in the front and the whole in the back is for the serial cable to
go through. Depending on how your metal expansion card covers are
made on the back you will probably need to either "snap"
it out or on some more expensive cases just unscrew one.
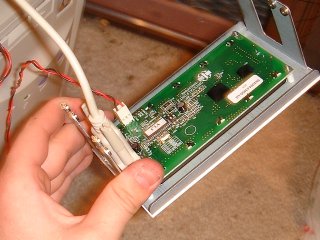
Installing
The LCD:
You will need to plug the cables (power and data) into the LCD before
screwing it in, this makes it easier and makes the connections as
firm as they can be. Once you have done this you can carefully slide
the LCD and Bracket into place and then you will need to screw it
into place with the supplied screws. Although there are eight holes
and only four screws this is fine, you should just use the top and
bottom holes on either side and leave the middle ones, the other
wholes are there just incase you need them to fit the kit into your
case.
Now that the
LCD and Bracket it nicely in place you will need to feed the Serial
Cable through the whole in the back of the computer and plug it
into your hopefully free 9 pin Serial COM Port. Then you need to
connect the power, if you don't have a spare HDD size power plug
then you will either need to make one or you can get one for around
five dollars at your local Dicksmith or Tandy store, this shouldn't
be the case as your using the bays that would otherwise have drives
and therefor spare plugs but some of you may have a mass array of
fans or other such devices using them already.
OK, the kit
is in and your ready to roll, its best to leave the case off just
incase you have to adjust it in some way. Just plug the power in
and boot up your machine.
Downloading
Software:
The software that you need to drive the LCD display can be freely
downloaded from the Internet. The following are just our selected
software for different Operating Systems, but there are many others
out there for you to try.
Linux:
http://lcdproc.omnipotent.net/download.php3
- LCDproc for Linux
Win9x/NT/2k:
http://www.2morrow.com/ -
LCDproc for Windows
http://www.crystalfontz.com/products/wintest/index.html
- Crystalfontz Windows Test Program
Just download
these programs and save them to your computer. You can now proceed
to installing them in the next step.
NOTE: The versions
of these programs that we used can be found in the files
section of our site. Also you will need Win2k Service Pack 1 installed
on your machine if you want this program to work, you can download
that here
if needed. (Unfortunately we didn't have the opportunity to test
the LCD in a Win9x machine, but it should be straight forward)
Setting
Up The Software:
Now that the kit is installed into your machine its time to proceed
to the installation stage. The following steps are how we installed
the software on my machines (Pentium II 450 running Windows 2000
and a Celeron 600 running Red Hat 6.2).
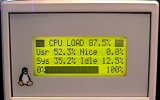
Linux:
Firstly I must say due to the nature of Linux the install maybe
different for you depending on the distribution and configuration
of you machine.
To uncompress the
file you will need to be in the directory in which you downloaded it to,
and you can simply enter this command: tar
-xzvf lcdproc-0.4-pre9.tar.gz.
Now to install
the program change into the directory created by the previous step,
i.e. cd lcdproc-0.4-pre9.
As usual the next recommended step is to read the provided installation
notes by cat INSTALL | more.
The way we proceeded from here was to edit the Makefile.config,
firstly we modified the DEVICE
line to point to the appropriate COM port on my machine which was
/dev/ttyS0. Then we commented (#)
out the lines of all the drivers we didn't want (this was only the
Matrix Orbital ones) the rest seemed to be "handy" and
could be used later. Now time to make, once that was done we logged
in as the super-user, su, and proceeded to do a make
install. If all went well then your program should be installed
and the /dev/lcd
link made to point to where your LCD is connected.
Win9x/NT/2k:
To install on Windows just double-click on the executable you downloaded,
in our case it is lcdsetup13.exe.
To step through the install all you need to do is select the directory
you wish to install the program and the start menu group you wish
it to appear in. When you have installed the software it will ask
you to make some simple configuration options as to what information
you want displayed and where the device is connected and what type
it is. Now your done, time to see what this baby can do.
The WinTest
program needs no installation, it can be run by double-clicking
the WinText.exe.
(you may need to extract it if you have downloaded the zip compressed
version)
NEXT:
Testing (Linux and Win2k)
|